Kubernetes Zero Trust: 9 Critical Steps to Harden Clusters in 2026
Kubernetes Zero Trust: 9 Critical Steps to Harden Clusters in 2026
In modern cloud-native architectures, the traditional perimeter-based security model is dead. Legacy firewalls and network perimeters are no longer sufficient to secure applications when containers run in dynamic, multi-tenant environments. Implementing a robust Kubernetes Zero Trust architecture is now an absolute requirement for platform teams and security operations center (SOC) engineers who need to defend workloads against sophisticated lateral movement, container escapes, and credential theft.
A core pillar of the Kubernetes Zero Trust model is the fundamental assumption of breach: “never trust, always verify.” Every service, pod, user, and control plane component must be explicitly authenticated, authorized, and cryptographically verified at every stage of the lifecycle. In this comprehensive production guide, we lay out 9 critical steps to harden your Kubernetes clusters to Zero Trust standards, backed by real-world YAML configurations and enterprise-grade policy templates.
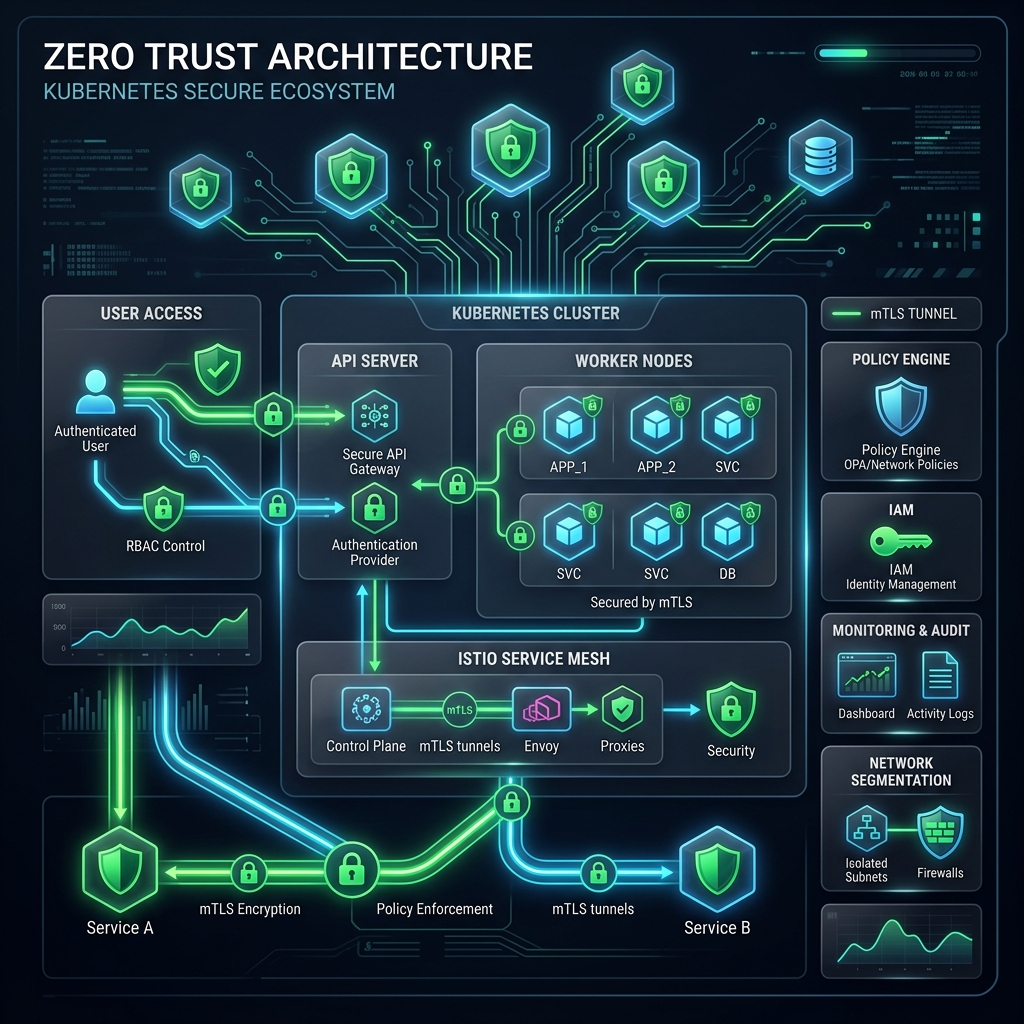
Table of Contents
- Why Kubernetes Zero Trust is Essential in 2026
- 9 Steps to Build a Kubernetes Zero Trust Cluster
- Step 1: Enforce Pod Security Standards (PSS)
- Step 2: Implement Network Micro-Segmentation
- Step 3: Harden RBAC & Apply Least Privilege
- Step 4: Secure Container Runtimes (Sandboxing)
- Step 5: Enforce mutual TLS (mTLS) with Service Mesh
- Step 6: Hardening Secrets Management & Encryption at Rest
- Step 7: Automate Policy Enforcement via Admission Controllers
- Step 8: Hardening the K8s Control Plane & etcd
- Step 9: Real-time Runtime Threat Detection & Auditing
- Verifying and Maintaining Your Kubernetes Zero Trust Posture
- Conclusion: The Zero Trust Roadmap
Why Kubernetes Zero Trust is Essential in 2026
Historically, teams treated Kubernetes clusters as secure bastions, relying on outer network walls to keep attackers at bay. However, if a single public-facing container is compromised, the default Kubernetes settings allow that pod to communicate freely with other pods, contact the internal metadata API, query the cluster DNS for discoverable services, and potentially exploit kernel vulnerabilities to gain root access to the host node. This lateral movement capability is precisely what a Kubernetes Zero Trust strategy seeks to eliminate.
In 2026, the proliferation of autonomous AI agents and automated vulnerability scanning tools means threat actors can discover and exploit container configuration drift within minutes. For organizations migrating to cloud environments, establishing Kubernetes Zero Trust helps mitigate these risks by isolating workloads, limiting blast radiuses, and cryptographically securing service-to-service communication. To build a solid foundation, check out our guide on Docker Container Hardening to secure your base images before deploying them to Kubernetes.
Additionally, modern DevSecOps pipelines must secure container image delivery. We recommend reviewing our GitHub Actions Hardening Checklist to prevent supply-chain tampering before workloads ever reach your staging or production environments.
Furthermore, cloud environments are heavily dependent on machine-to-machine integrations. When managing API keys, database credentials, or access tokens within containerized applications, you must ensure these credentials are not exposed through broad IAM permissions. Reviewing the Non-Human Identity (NHI) Zero Trust Blueprint will provide key insights into managing service accounts and cloud IAM boundaries.
9 Steps to Build a Kubernetes Zero Trust Cluster
To successfully transition your container infrastructure to a Kubernetes Zero Trust model, apply the following 9 steps across your staging and production environments. Each step targets a different layer of the cloud-native stack, establishing multiple redundant defense mechanisms.
Step 1: Enforce Pod Security Standards (PSS)
Workload hardening is essential for enforcing Kubernetes Zero Trust at the pod level. Following the deprecation of PodSecurityPolicies in version 1.21 and their complete removal in 1.25, Kubernetes native Pod Security Standards (PSS) provide a built-in admission control mechanism to restrict pod execution parameters directly. PSS defines three distinct profiles: Privileged (unrestricted), Baseline (prevents known privilege escalations), and Restricted (highly hardened according to best practices).
For a production-grade Kubernetes Zero Trust setup, you must enforce the Restricted profile on all non-system namespaces. This profile blocks running as root, prevents host namespace access, disables privilege escalation, restricts host ports, and enforces read-only root filesystems. If an application requires writing temporary files, it must use `emptyDir` mounts rather than writing directly to the root partition.
Below is a production manifest demonstrating how to enforce the restricted profile at the namespace level:
apiVersion: v1
kind: Namespace
metadata:
  name: billing-prod
  labels:
    pod-security.kubernetes.io/enforce: restricted
    pod-security.kubernetes.io/enforce-version: "v1.30"
    pod-security.kubernetes.io/warn: restricted
    pod-security.kubernetes.io/warn-version: "v1.30"
When this namespace label is applied, the Kubernetes API server will reject any pod deployment that does not explicitly set `runAsNonRoot: true`, `allowPrivilegeEscalation: false`, and other required security contexts. For detailed standards, consult the Kubernetes Pod Security Standards documentation. By locking down namespaces, we guarantee that containers cannot execute as privileged root users, greatly reducing the risk of host compromise.
Step 2: Implement Network Micro-Segmentation
By default, Kubernetes uses a flat network model where any pod can talk to any other pod across namespaces. Network micro-segmentation is key to Kubernetes Zero Trust network isolation. Platform teams must implement a default-deny ingress and egress policy for all namespaces, then explicitly whitelist only the traffic flows necessary for application functionality.
Using a modern Container Network Interface (CNI) like Cilium allows you to enforce layer-3, layer-4, and layer-7 network security policies. Cilium utilizes eBPF (Extended Berkeley Packet Filter) to filter traffic directly in the Linux kernel, bypassing the slow and complex iptables chains. This provides high-performance packet filtering and detailed flow logging. Here is a standard Kubernetes `NetworkPolicy` that enforces default-deny on a namespace, followed by an ingress whitelist:
apiVersion: networking.k8s.io/v1
kind: NetworkPolicy
metadata:
  name: default-deny-all
  namespace: billing-prod
spec:
  podSelector: {}
  policyTypes:
  - Ingress
  - Egress
---
apiVersion: networking.k8s.io/v1
kind: NetworkPolicy
metadata:
  name: allow-api-to-db
  namespace: billing-prod
spec:
  podSelector:
    matchLabels:
      app: database
  ingress:
  - from:
    - podSelector:
        matchLabels:
          app: payment-api
    ports:
    - protocol: TCP
      port: 5432
With this setup, the database pod will reject all network requests unless they originate from the `payment-api` pod on port 5432, maintaining strict Kubernetes Zero Trust connectivity within the cluster.
Furthermore, egress policies should restrict pods from calling public IP addresses or internal cloud metadata endpoints. For instance, you should block egress to `169.254.169.254` (the AWS/GCP/Azure link-local metadata address) to prevent compromised pods from stealing IAM credentials. Here is a manifest to block egress to the cloud metadata API:
apiVersion: networking.k8s.io/v1
kind: NetworkPolicy
metadata:
  name: block-cloud-metadata
  namespace: billing-prod
spec:
  podSelector: {}
  policyTypes:
  - Egress
  egress:
  - to:
    - ipBlock:
        cidr: 0.0.0.0/0
        except:
        - 169.254.169.254/32
Step 3: Harden RBAC & Apply Least Privilege
Role-Based Access Control (RBAC) represents the identity boundary of your cluster. A least privilege RBAC is crucial in any Kubernetes Zero Trust strategy. You must restrict who can edit namespaces, manage secrets, or execute commands inside running containers. Pay close attention to ServiceAccounts, which are often over-privileged and can be hijacked by attackers to compromise the API server.
Avoid assigning cluster-admin roles to human users or service accounts unless absolutely necessary. Instead, use localized `Roles` and `RoleBindings` rather than `ClusterRoles` and `ClusterRoleBindings`. Review your permissions regularly to ensure service accounts cannot write secrets or patch API objects. For service-to-service authentication in enterprise ecosystems, refer to our comprehensive guide on the Non-Human Identity (NHI) Zero Trust Blueprint to manage non-human credentials securely.
To implement a secure, restricted RBAC Role, restrict access to the absolute minimum necessary API resources. For example, a pod that only needs to list other pods in its namespace should be bound to a Role like this:
apiVersion: rbac.authorization.k8s.io/v1
kind: Role
metadata:
  namespace: billing-prod
  name: pod-lister
rules:
- apiGroups: [""]
  resources: ["pods"]
  verbs: ["get", "list"]
---
apiVersion: rbac.authorization.k8s.io/v1
kind: RoleBinding
metadata:
  name: bind-pod-lister
  namespace: billing-prod
subjects:
- kind: ServiceAccount
  name: api-service-account
  namespace: billing-prod
roleRef:
  kind: Role
  name: pod-lister
  apiGroup: rbac.authorization.k8s.io
Additionally, you must disable the automatic mounting of the default ServiceAccount token by setting `automountServiceAccountToken: false` in your pod spec. By default, Kubernetes mounts a service account token to every pod, which allows an attacker who compromises the pod to immediately authenticate to the API server. Turning off this default mount is a core step for securing pod identity under Kubernetes Zero Trust rules.
Step 4: Secure Container Runtimes (Sandboxing)
Standard container runtimes (like `containerd` and `CRI-O`) share the host’s Linux kernel. If an attacker exploits a kernel zero-day vulnerability from inside a pod, they can escape the container and compromise the entire worker node. Securing container runtimes under a Kubernetes Zero Trust framework requires isolating high-risk or public-facing workloads inside a gRPC-based container sandbox.
Utilizing sandboxed runtimes like Google’s gVisor or Kata Containers provides a virtualized kernel wrapper around each pod. This setup intercepts system calls and blocks malicious escapes. gVisor implements a user-space kernel called the Sentry, which intercepts all system calls made by the application, preventing them from interacting directly with the host kernel. Kata Containers, on the other hand, runs each pod within a dedicated, lightweight virtual machine (VM) using QEMU or Firecracker, achieving hardware-level isolation.
To deploy sandboxed runtimes, define a `RuntimeClass` and assign it to the spec of sensitive deployments:
apiVersion: node.k8s.io/v1
kind: RuntimeClass
metadata:
  name: gvisor
handler: runsc
---
apiVersion: apps/v1
kind: Deployment
metadata:
  name: public-web-server
  namespace: billing-prod
spec:
  replicas: 3
  selector:
    matchLabels:
      app: web
  template:
    metadata:
      labels:
        app: web
    spec:
      runtimeClassName: gvisor
      containers:
      - name: nginx
        image: nginx:1.25-alpine
    spec:
      runtimeClassName: gvisor
      containers:
      - name: nginx
        image: nginx:1.25-alpine
By leveraging gVisor, even a root-level exploit inside the web server container will only compromise the sandboxed virtual environment, leaving the host operating system unaffected. For platform teams managing untrusted user code or external-facing APIs, this is a non-negotiable step to maintain Kubernetes Zero Trust boundary isolation.
Step 5: Enforce mutual TLS (mTLS) with Service Mesh
Encrypting transit data and validating identities is a fundamental step. Mutual TLS is a foundation of Kubernetes Zero Trust service-to-service security. You must ensure that no network packet travels in cleartext and that every workload identity is verified using cryptographic x509 certificates.
Deploying a service mesh like Istio or Linkerd provides transparent mTLS for all pod-to-pod communications. These tools inject sidecar proxies that automatically handle certificate rotation, session encryption, and access control. Using SPIFFE (Secure Production Identity Framework for Everyone) and SPIRE (SPIFFE Runtime Environment), service meshes generate short-lived, cryptographically verifiable identities for each workload.
Here is a production-grade Istio `PeerAuthentication` manifest that enforces strict mTLS cluster-wide:
apiVersion: security.istio.io/v1beta1
kind: PeerAuthentication
metadata:
  name: default
  namespace: billing-prod
spec:
  mtls:
    mode: STRICT
Applying this policy forces all services inside the `billing-prod` namespace to communicate using encrypted TLS tunnels. Any legacy pod attempting cleartext HTTP requests will be automatically rejected at the network layer. In a Kubernetes Zero Trust model, STRICT mTLS prevents eavesdropping, intercept attacks, and unauthorized lateral requests across services.
Step 6: Hardening Secrets Management & Encryption at Rest
Protecting secrets is an absolute must in Kubernetes Zero Trust environments. By default, Kubernetes stores `Secrets` in `etcd` as base64-encoded strings, which are easily readable by anyone with read access to the database or cluster backups. To secure sensitive data, implement two controls: enable KMS encryption at rest for `etcd`, and integrate an external secrets provider.
To enable KMS encryption at rest, you must configure the kube-apiserver with an encryption configuration file that specifies a Key Management Service (KMS) provider (such as AWS KMS, Azure Key Vault, or HashiCorp Vault) to encrypt etcd keys before they are saved. Below is an example of an `EncryptionConfiguration` using KMS v2:
apiVersion: apiserver.config.k8s.io/v1
kind: EncryptionConfiguration
resources:
  - resources:
      - secrets
    providers:
      - kms:
          apiVersion: v2
          name: aws-kms-provider
          endpoint: unix:///var/run/kmsplugin/socket.sock
          cachesize: 1000
          timeout: 3s
      - identity: {}
Rather than storing credentials directly in Kubernetes, leverage solutions like the Kubernetes Secrets Store CSI Driver to fetch credentials from enterprise vaults dynamically at pod startup. This ensures secrets are stored in memory (`tmpfs`) inside the container and are never persisted to disk or etcd. This integration is vital to keeping sensitive data secure under a Kubernetes Zero Trust security posture.
Step 7: Automate Policy Enforcement via Admission Controllers
Static checklists are prone to human error. Admission controllers automate policies for Kubernetes Zero Trust enforcement, acting as gatekeepers that intercept API requests before objects are persisted to the cluster. By deploying policy engines like Kyverno or OPA Gatekeeper, you can block non-compliant resources in real time.
For instance, a corporate security policy might require all container images to originate from your internal registry and be digitally signed using Cosign. The following Kyverno policy blocks any deployment that attempts to use unsigned images or public Docker Hub tags:
apiVersion: kyverno.io/v1
kind: ClusterPolicy
metadata:
  name: restrict-image-registries
spec:
  validationFailureAction: Enforce
  background: true
  rules:
  - name: validate-registries
    match:
      any:
      - resources:
          kinds:
          - Pod
    validate:
      message: "Images must be sourced from internal secure registries."
      pattern:
        spec:
          containers:
          - image: "https://codesecai.com/wp-content/uploads/* | http://internal-registry.corp/*"
This automated validation blocks insecure code from entering your clusters, protecting against container supply-chain attacks. Policy engines are crucial for maintaining continuous compliance with your Kubernetes Zero Trust guidelines without manual code review bottlenecks.
Step 8: Hardening the K8s Control Plane & etcd
Hardening the control plane is central to a Kubernetes Zero Trust cluster posture. If the API server or etcd is exposed, the cluster is vulnerable to complete takeover. Implement these control plane defenses:
– **Private API Server**: Restrict public access to the Kubernetes API server using firewall rules, VPC peering, or authorization proxies.
– **Enable Audit Logging**: Configure detailed security auditing, routing logs to a centralized SIEM for real-time analysis.
– **etcd TLS**: Force etcd to communicate only via encrypted mutual TLS, restricting access to the API server nodes exclusively.
– **Disable Anonymous Requests**: Disable the `–anonymous-auth=false` flag on the API server to block unauthenticated requests.
– **Secure Kubelet API**: Secure the Kubelet port `10250` by configuring Kubelet authentication to use Webhooks instead of anonymous requests, ensuring that only the API server can invoke commands on worker nodes.
Step 9: Real-time Runtime Threat Detection & Auditing
Real-time runtime detection completes the Kubernetes Zero Trust loop. Even with strict policies and encryption, zero-day vulnerabilities can still occur. You must monitor system calls and file system modifications continuously from within container runtimes.
Deploying tools like Falco or Cilium Tetragon provides deep visibility into running containers. Falco monitors system calls (`syscalls`) at the kernel level and triggers alerts on suspicious behaviors, such as spawning shell processes inside containers, writing to write-protected directories, or modifying system binaries. By integrating these alerts with your SIEM, you can terminate compromised pods automatically within seconds of anomaly detection.
For example, a Falco rule can alert you if someone attempts to run a bash terminal inside a production container. Below is an example of a custom Falco rule for runtime detection:
- rule: Shell in Production Container
  desc: A shell was spawned inside a running production container
  condition: container.id != host and proc.name = bash and evt.type = execve
  output: "Shell spawned in container (user=%user.name %proc.cmdline container_id=%container.id)"
  priority: WARNING
This runtime security wrapper acts as the final line of defense in a comprehensive Kubernetes Zero Trust infrastructure, ensuring that any exploit is identified and mitigated in real time before it can spread.
Verifying and Maintaining Your Kubernetes Zero Trust Posture
Establishing a Kubernetes Zero Trust environment is an ongoing process that requires constant validation. Platform teams should perform regular scans using security tools like Kube-bench (which validates clusters against CIS benchmarks) and Trivy (which scans container images and configurations for vulnerabilities).
Below is a summary of the key validation checks you must perform routinely to ensure your clusters remain hardened:
| Security Layer | Validation Tool | Compliance Metric |
|---|---|---|
| Pod Security | Kube-bench / Trivy | 100% Namespace coverage for Restricted PSS |
| Network Segmentation | Cilium Connectivity Tests | Zero cross-namespace traffic unless whitelisted |
| Identity & RBAC | Krane / Kubesec | No wildcard service account privileges |
| Secrets Security | CIS etcd Audits | KMS Encryption enabled at rest in etcd |
Using these tools alongside a CI/CD integration helps security teams track compliance metrics and quickly fix configuration drift before it reaches deployment. By treating security as code, your Kubernetes Zero Trust rules adapt and scale alongside your workloads.
Conclusion: The Zero Trust Roadmap
Transitioning your cloud infrastructure to a Kubernetes Zero Trust model requires a shift in mindset: moving from perimeter-focused security to micro-segmented, service-to-service validation. By implementing these 9 steps—ranging from Pod Security Standards to real-time eBPF runtime threat detection—you build a highly resilient infrastructure capable of isolating threats and protecting sensitive enterprise data.
For more advanced topics in security architecture and defending self-hosted workloads, explore our detailed LLM Hardening Playbook for self-hosted artificial intelligence models, which applies these same Zero Trust principles to modern generative AI workloads.

![[SIR-005] The Ultimate Guide to Defeating Stochastic RCE: Mitigating the 2026 NHI Crisis](https://codesecai.com/wp-content/uploads/2026/05/featured_image-7-300x169.jpg)